We have discussed a lot about BlogSpot and WordPress blogging platforms for the past 8 years but never did we expect that these two platforms could have a third rising competitor called "Wix" that is dramatically becoming a leading cloud-based website development platform to over 90 million users worldwide. It is currently the most popular drag and drop website building platform with HTML5 capabilities offering 15 different template categories. Whether you wish to create a free mobile responsive blog, online store or business site, it honestly makes every technical detail look like a piece of cake.

Back in 2008 when I started my online career, I would often see people creating professional websites using Wix within seconds without having any technical skills or knowledge about coding or web designing. Over the past few weeks a lot of our blog readers have started taking interest in Wix's free website builder to create personalized, high-quality free websites. They have been asking us several questions regarding whether Wix websites are SEO friendly or not. To inspect this, I took a detailed overview of Wix�s SEO tools, its platform and features. I have completed an in-depth SEO audit report which I would like to share with you all.
No content management platform be it WordPress, Blogger or Wix, can help you to attract thousands of visitors to your website unless you know how to optimize the platform and make it search friendly. Wix does surely provide its users with all tools required to make a website rank higher in SERPs, all that is needed is making the best possible use of these tools by following correct SEO settings. Today we will be discussing 10 killer SEO tips to help you take your Wix website to the next level. But before that lets discuss some basics first!
How to Create a Wix Website?
1 Sign up for free Wix account

2 Wix will give you two options: Either to customize your site using Wix ADI or Wix Editor. If you are a fan of Artificial Design Intelligence then you should go with Wix ADI but if you want to manually personalize your site using advanced features then go with Wix Editor.

3 Choose a template out of 500+ professional free layouts

4 Hover over a template and click the edit button

5 Start customizing your site by add anything like text, background images & more using Wix website builder. Editing your site is simply fun. Just drag and drop the elements to give your site a perfect look based on your preferences.

6 Finally click the publish button and you will be asked to name your site domain.

You can either go with a free domain or you can choose to buy a custom domain to give your site a more professional look. Website domain charges at Wix are extremely cheap. You can either connect an existing domain you might have bought from an external domain registrar or you can choose to buy a new domain from Wix itself at a fairly reasonable cost.

Finally you are ready to showcase your site to the world!
Are Wix Websites SEO Friendly?
When Wix was first launched in 2006 it served Flash based web pages which were though user friendly and crawl-able by search engines but Wix Flash sites were more limited in the options they provided users to engage in the process of SEO. But Since 2012, with the launch of their HTML5 Editor, a massive improvement was done which completely changed the wrong myths related to Wix SEO.
Wix has now made site SEO a major priority. There have been many updates made in this regard, in order to fully conform to the guidelines set forth by the search engines. Some of the updates include, the provision of user friendly URLs, improvements in loading time of sites, elimination of the canonical tag to the homepage, and automatically produced mobile-optimized versions of all Wix websites.
Based on these latest improvements, Wix has surely changed the views of webmasters and SEOs around the world. I have therefore decided to write several tutorials to help people make their online presence even more worthwhile using Wix.
Lets begin with our 10 Killer SEO tips that will make any Wix Website search friendly.
1. Verify Your Wix Website With Google, Bing & Yandex
First and foremost step is to let all search engines know about your site so that they could crawl and index your site. At present the leading search engine is Google but submitting your site to Bing/Yahoo and the Russian search engine Yandex will give you extra flow of organic traffic. More traffic means more sales and more business!
Each search engine gives you a meta tag for verification that you will need to add to your Wix site.I will be discussing the method for Google Webmasters only and exact same procedure is applied for Bing and Yandex Webmasters account.
To verify your Wix website With Google Webmasters tool follow these steps:
- Go to Google Search Console, signup if you have not already and then submit your site URL.
- select the HTML tag method under the "Alternate methods" tab. Copy the HTML meta tag code and keep it save for later use.
- Proceed to Wix Editor and then choose Site Manager option under Site tab.
- Click the SEO tab.
- Scroll down to More SEO Settings.
- Paste the Google Meta Tag code in the text box under Header Code - Meta Tags.
- Now go back to Google Search Console page and click Verify. Thus you have successfully verified your Wix website with Google!


Exact same method apply to Bing and Yandex search engine.
2. Submit Wix Sitemap To Google, Bing & Yandex
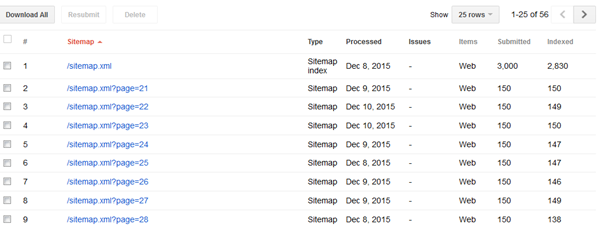
After you have verified your site with Google/Bing/Yandex, you can now submit your Wix Sitemap to these search engines so that your site is automatically indexed and crawled each time you update it.
Wix creates a search friendly sitemap.xml file for your websites that will help search engines keep track of your site content on a regular basis.
To submit your Wix sitemap:
- Select your site on your Google Search Console home page.
- Click Crawl.
- Click Sitemaps.
- Click ADD/TEST SITEMAP.
- Type sitemap.xml.
- Click Submit and you are all done!


Your sitemap is located at your root domain directory i.e.
http://Your-Wix-Site.com/sitemap.xml
You will need to submit this sitemap to Bing and Yandex in almost similar same way. That simple!
3. Block a Page Without Editing Wix's Robots.txt File
Wix automatically generates a robots.txt file for every Wix site. You can view this file by adding '/robots.txt' to your root domain i.e.
http://Your-Wix-Site.com/robots.txt
Wix does not allow its users to edit robots.txt file because Wix SEO team takes care of your robots.txt file themselves and they make sure that pages which are not important to you may not appear in search results. Wix has added files related to the structure of Wix sites to the robots.txt file, including noflashhtml and backhtml links. As these links do not contribute to your site's value in terms of SEO, they do not need to be crawled.
You can block pages from appearing in search results either using robots.txt file or by using the noindex meta tag. If in case you wish to hide a certain page of your Wix website from search engines then you can do this by following this work around:
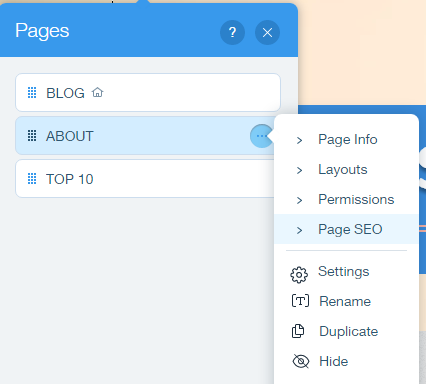
- Click the Pages Menu
 from the top bar of the Editor.
 - Click the relevant page.
- Click the Show More icon
 .
. - Click Page SEO.
- Click the toggle next to Hide this page from search results to enable the option.
- Click Done. Wix will automatically add a noindex tag to the header of that page.

Thus you have successfully blocked a page of your site from appearing in search results without having to edit your robots.txt file
4. Add Google Analytics Code To You Wix Website
Google Analytics allows you to track information about your site including:
- Total number of visitors to your site
- Visitor's geographical location
- Length of stay
- Find in real time which pages your visitors are reading
- Much more!
To use Google Analytics, start by upgrading your Wix site with a Premium Plan so you'll be able to connect a custom domain. To connect your analytics account with your Wix custom domain, follow these easy steps:
- Click here to sign in to your Wix account.
- Hover over the user panel at the top right and click Domains.
- Click the expand arrow next to the domain connected to the site you want to track.
- Click the Analytics tab.
- Paste your Google Analytics code into the Google Analytics Code field. Make sure that there are no extra spaces before the code!
- Click Submit.
5. 301 Redirect Your Old site To Your New Wix Website
This one is an advanced option and requires you to clearly understand what exactly are 301 redirects. The basic purpose of a 301 redirect is to retain the SEO ranking of your existing site links when creating a new site with Wix. It also helps you to redirect your old/deleted page links to the corresponding pages on your new Wix site.
You can redirect your old site to the new Wix site by doing a simple 301 redirect of each page to the newly created Wix pages.
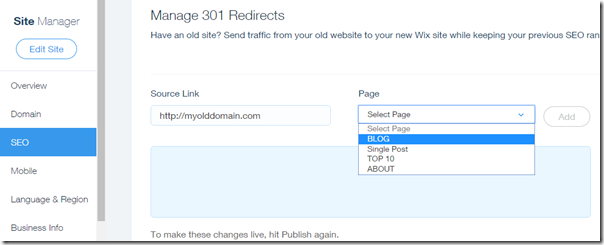
- From inside Wix Editor, go to Site > Site manager
- Click SEO tab
- Scroll down to "Manage 301 Redirects"
- Inside the source link, type your old Page link and from the "Page" field select the corresponding page you created on Wix.
- Hit the Publish button when you are all done!
Using this tool you can also redirect deleted Wix pages to the new pages. By default 404 pages in Wix are auto redirected to the homepage. Incase you have deleted a Wix page but it is still appearing in search results then you can redirect that deleted page to a new page using the 301 Redirect tool.
6. Optimize Meta Title Tags in Wix
Your page title tag is used as the headline of each page. Your Title tag is not visible to your visitors on your webpage but it appears in the source code of the page, where it is visible to search engines.

Your page title is also used:
- When Someone bookmarks your page
- When your page is shared on Facebook/Google+/Twitter and other social media networks
- In the browser tab
Make sure your title contains your primary keyword and make sure your title does not exceed the 60 characters optimal length for search engines. Make sure your title is easy to read and attractive - a relevant and descriptive title is more likely to 'convince' users to click it in search results.
TIP: You can use our character counter tool
Google displays the first 50-60 characters of a title tag. If you keep your page titles under 55 characters, you can expect at least 97% of your titles to display properly in search results. A title longer than 60 characters is trimmed by Google in SERPS.
To change the title tag of a page, follow these steps:
- Click the Pages Menu from the top bar of the Editor.
- Click the relevant page.
- Click the Show More icon
 .
. - Click Page SEO.
- Enter the page title under What's the page's title on search engines?.
- Click Done.
- Click Publish at the top right of the Editor.


7. Optimize Meta Description Tags in Wix
Meta description tag is the soul of your entire content. It gives a simple, precise and summary of your entire article. A robot finds it extremely helpful when you provide a short 145 Characters summary of your blog posts. It is the second biggest ranking factor after the title. When you don't manually choose a description for your blog posts, you give your competitors a bigger chance to rank higher than you.
Just like your title tag, description tag is not visible on your site's page, but appears below your title in search results.

Note these three points to write SEO friendly Page descriptions:
- Description should not be less than 50 characters or exceed 145 characters (Google trims the description after 160 characters), spaces included.
- Your description must include your primary keyword or phrase.
- Make sure to create a compelling and eye catching description in order to entice users to click.
To change Wix page description follow these steps:
- Click the Pages Menu ?? from the top bar of the Editor.
 ?
? - Click the relevant page.
- Click the Show More icon ??.
- Click the Page SEO.
- Enter the page description under What's the page about?.
- Click Done.

8. Optimize Permalinks Of Your Wix Website
Most people do not realize that permalink is the third most important place after title and description, where they can insert their focus keyword for maximum search exposure.
An optimized permalink or SEO friendly URL is a combination of targeted keywords that explains the content of your webpage. It should be precise and to the point. Long, lengthy links get chopped in search results and you loose the opportunity of ranking high in SERPs.
-
Depending on your URL structure keep it limited to 40 Characters
-
Must insert your primary Keyword in permalink
-
Keep it short and to the point

For optimizing permalinks of a Wix website follow these steps:
- While editing a blog post in Wix editor, click the "Advanced SEO" button
- Under the "URL Permalink" section, insert your keywords keeping in mind best SEO practices that we discussed
- For editing the permalink of a static page click "Site Manager" inside the Wix Editor and then choose "Page SEO" tab


That's how you can optimize the permalink slug for Wix Pages and blog posts.
9. Effective Use Of H1, H2 and H3 Heading Tags
Heading tags play a vital role in better explaining your site content to search robots by highlighting areas which represent the soul and heart of your website content. Just like how important are newspaper headlines for its users, same is the case with page heading tags which are not only important with regard to readability but also when it comes to ranking high in search results.
Heading tags are an important part of your site's SEO and are highly regarded by search engines. Search engines give a lot of important to heading tags in the following order of descending importance.
- H1 - Used In Site Title
- H2 - Used In Page Title
- H3 - Used in Sub Headings Inside Content
- H4
- H5
- H6
Heading Tag Tips For Wix Sites:
For Homepage
- Each page should have its own unique set of heading tags.
- A page should have one H1 tag only, as the H1 tag acts as the page headline.
- Make Sure H1 Tag is assigned only to main website Title on Homepage. i.e. LOGO Text.
- Assign H2 Tags for Headlines on Homepage and H3 for Sub Headlines
For Pages and Posts
- On Static Pages or Blog Posts, assign H1 To Page Title Only. Set the LOGO text as normal paragraph.
- One Pages or Posts, assign H2 to Headlines and H3 to Sub Headlines
Optimize Heading Tags:
- Click Add ?
 ? on the left side of the Editor.
 - Click Text.
- Click Site Title.
- Click the text element.
- Click Edit Text.
- Edit the text.

10. Optimize Images Using "Alt" Text In Wix
Yes robots are blind to media! They can not read your images unless you add a "alt" attribute (alternative text) to your images.
If you are not tagging your site images, you are loosing the opportunity to gain organic traffic from Image search and indirectly give an edge to your competitors. Robots can not understand what your image is all about without the alt attribute. Wix helps you to easily add the alt text to your images through the Image tool.
To add Alt Text to an image in Wix follow these steps:
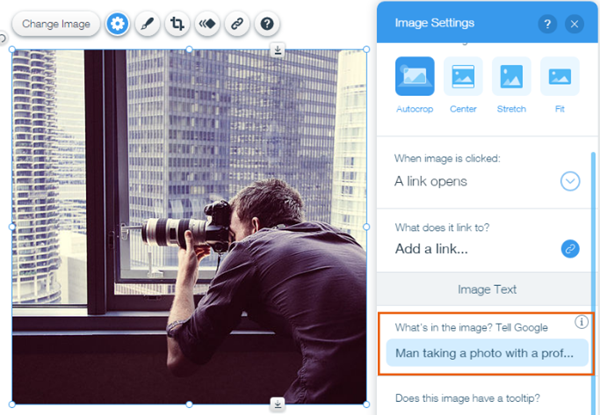
- Click the image.
- Click the Settings icon ?
 ?.
?. - Enter a description of the image under What's in the image? Tell Google.
Follow these tips to ensure you optimize the images well:
- The Alt text should be short and descriptive;
- Do not exceed an alt text longer than 70 characters.
- Make sure to insert your primary keyword here if needed
Tell Us Any New Wix SEO Tip!
I just hope we have covered almost every basic and advanced Wix SEO tip to ensure you make the most out of your Wix websites. Wix has surely changed the way people used to design websites. Website building which was once costly and required complex technical skills is now a simple game of drag and drop thanks to free website building platforms like Wix.
If you are a Wix user or if you just started using Wix, let us know any unique SEO tip that we might have missed discussing. I would love to hear your precious views on how you use Wix to optimize your site and how has Wix helped you in making your online presence more productive. Let me know if you have any queries related to Wix SEO, I would love to answer them as soon as time allows.


 Most wordpress SEO Plugins including Yoast SEO are too overwrought and heavy-handed, especially for users who implement stuff like .htaccess,


 After clicking the "Give me suggestions" button, these were the related keywords I got:


